How to Use
Bug reports, feature requests, and usage questions — all welcome.
[email protected]
1. Before You Start
System Requirements
| Item | Requirement |
|---|---|
| OS | Windows 10 / 11 |
| Browser | Google Chrome (must be installed) |
| Internet | Required for login and API communication |
Accounts & Keys You'll Need
2. Pre_Setting 4 Steps
When you launch the app for the first time, the 'PRE_SETTING' screen appears. Complete all 4 steps in order to unlock recording and agent features.
Step 1 — Detect Chrome
The app automatically searches for Chrome installed on your PC.
google.com/chrome and restart the app.Step 2 — Google Login
Sign in to your Google account in the dedicated Chrome profile for automation.
Step 3 — OpenAI API Key
Used by AI to summarize results before sending them to Telegram.
platform.openai.com, add a payment method and make your first purchase.Step 4 — Telegram Bot Setup
Used for remote control and receiving results.
@BotFather and open a chat./newbot. Enter a display name (e.g. My Mochi Bot).bot (e.g. my_mochi_bot).1234567890:ABCDefgh-IjklMNOpqrsTUVwxyz1234567@my_mochi_bot) — searching by name alone won't find bots.'Mobile:' Search directly in the Telegram app | 'PC:' Install from
desktop.telegram.org then search |
'Web:' Go to web.telegram.org then search
/start.{TOKEN} with your actual token):https://api.telegram.org/bot{TOKEN}/getUpdates
"chat":{"id": 123456789} — that number is your Chat ID.Open user_data/.env in Notepad and add (or update) these two lines:
TELEGRAM_TOKEN=paste_your_token_here
TELEGRAM_CHAT_ID=paste_your_chat_id_here
Save the file and restart the app. The status in 'Telegram Bot' will change to 'SUCCESS'.
3. Main Menu Overview
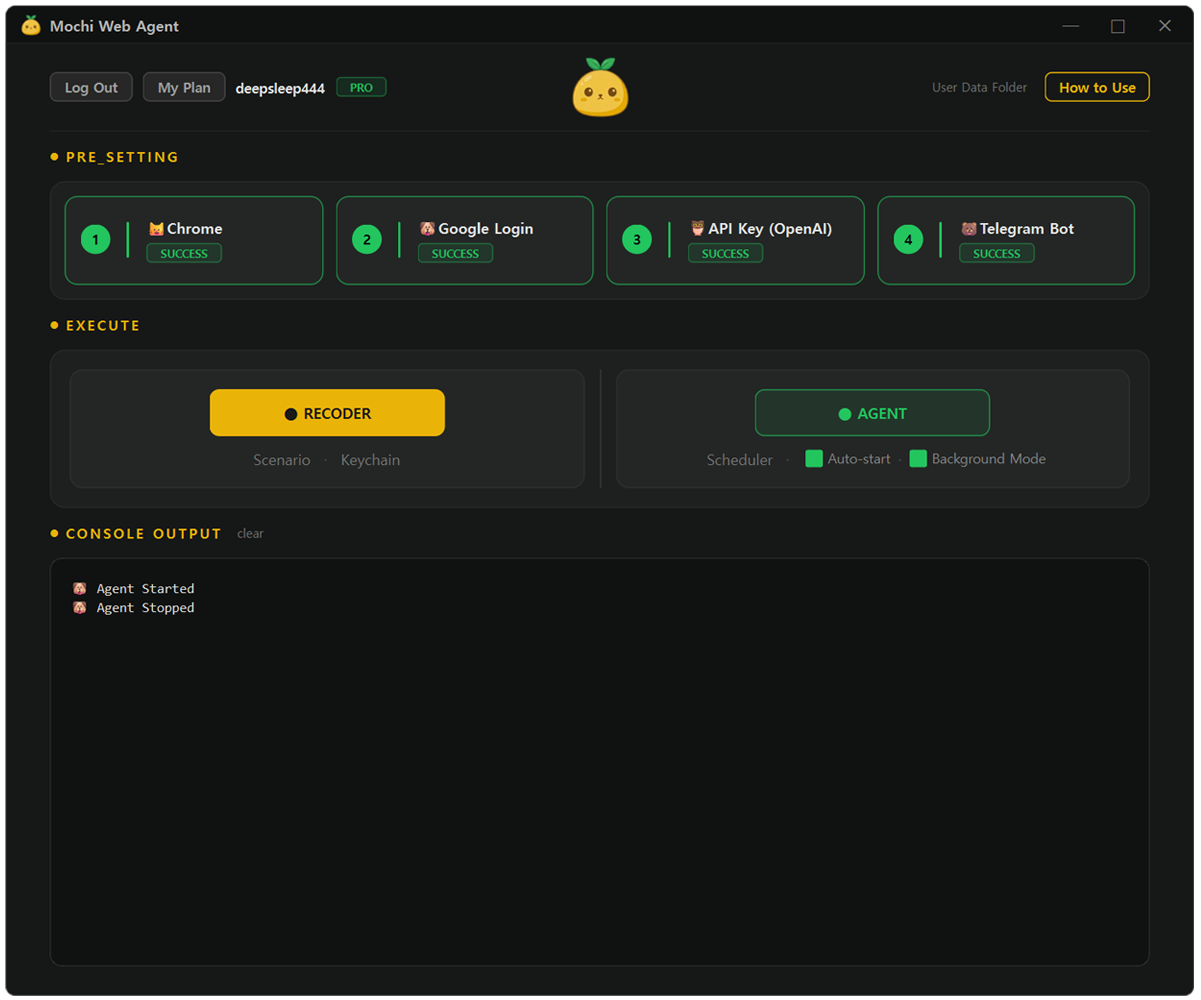
| Menu | Description |
|---|---|
| Log In/Out | Login, sign up, or reset password |
| My Plan | View your plan and upgrade options |
| User Data Folder | Open the user data folder |
| How to Use | Go to this user manual |
| PRE_SETTING | Pre_Setting (4 steps) |
| RECORDER | Record automation scenarios |
| Scenario | Manage and edit saved scenarios |
| Keychain | Manage saved credentials |
| AGENT | Start the agent |
| Scheduler | Schedule automatic runs |
| Auto-start | Start the agent automatically when the app launches |
| Background Mode | Hide the browser window while running |
| CONSOLE OUTPUT | View execution logs and errors |
| clear | Clear the console output |
4. Recording Scenarios
A scenario is a step-by-step list of instructions for browser automation.
4-1. Recorder Panel
When you open the recorder, a small floating panel appears alongside your automation browser.
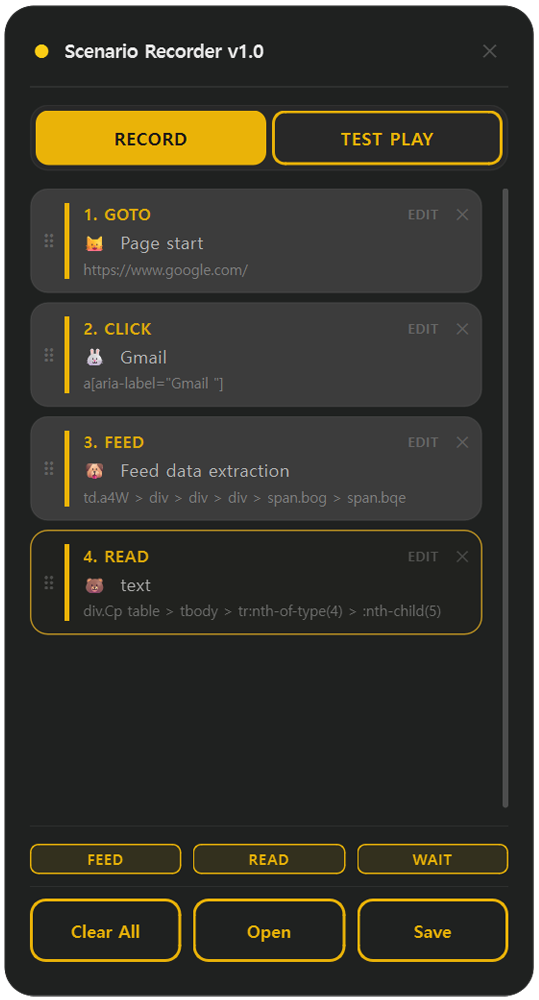
| Button | What it does |
|---|---|
| RECORD / STOP | Start / Stop recording |
| TEST PLAY / STOP | Run the current steps to verify they work |
| FEED | Collect a list of repeated items |
| READ | Read a single value from the page |
| WAIT | Insert a manual wait step |
| Clear All | Delete all steps |
| Open | Load an existing scenario file |
| Save | Save the current steps to a file |
| EDIT | Edit step description / set IF Mode |
4-2. Basic Recording Flow
'CLICK:' Click any clickable element. A popup appears asking for a step description. If you click a link, a second popup asks "Navigate directly to this URL?" — Confirm → GOTO step. Decline → CLICK step.
'Typing:' Type in any input field — it's recorded as a FILL step after 2 seconds.
Automatically Recorded Step Types
| Action | Step type |
|---|---|
| Navigating to a page | GOTO |
| Clicking a button, link, or element | CLICK |
| Typing in an input field | FILL |
4-3. FEED — Collect a List of Items
FEED collects repeated list items in bulk — news headlines, search results, product listings, etc. You click two items, and the app extracts a CSS selector to grab text and URL of every matching item.
Basic FEED (no anchor)
Example: Collecting a news list
- Click first item: "Apple reports record Q2 earnings..."
- Click second item: "Tesla unveils new Model Y..."
- Extracted pattern: "ul.news_list > li.news_item" (32 matches)
→ Confirm → feed step recorded
Anchor FEED (with category label)
Use when a page has multiple sections mixed together and you only want items from one specific section — for example, only the news under "Top Stories", or only products under "Best Sellers".
How FEED Runs
If an anchor is set, the app scrolls to find it (up to 60 seconds), then collects only items below it. The {{count}} variable limits how many items are collected (default: 5). Results are summarized by AI based on the Prompt, then sent to Telegram.
4-4. READ — Read a Single Value
'READ' reads the text from one specific element on the page and saves it as a variable. Use it for single data points like a stock price, exchange rate, weather temperature, or inventory count.
AAPL Stock Price, Current Temperature).Example: Reading a stock price - Click READ → click the price number → name it "AAPL Stock Price" - Result: "AAPL Stock Price: 189.30" → sent to Telegram Example: Reading multiple values in a row 1. goto — https://finance.example.com 2. read — "AAPL" (click the price cell) 3. read — "GOOGL" (click the price cell) 4. read — "MSFT" (click the price cell) → All three stock prices sent to Telegram
FEED vs READ
| FEED | READ | |
|---|---|---|
| What it collects | A list of repeated items | One specific element |
| Data captured | Text + link URL | Text only |
| Count limit | Controlled by {{count}} | Always 1 |
| Use cases | News lists, product listings | Stock prices, weather |
4-5. WAIT — Insert a Wait
Use when a page loads slowly and steps fail because elements aren't ready yet.
2, 0.5, 3).4-6. Editing & Managing Steps
Clicking a Step — SELECTOR Highlight
Clicking a step in the list highlights the corresponding element in the browser with a blue border (SELECTOR). Use this to verify the right element is targeted.
Edit a Step
Press the 'EDIT' icon to update the description or toggle IF Mode.
IF Mode (for CLICK / FILL steps)
When enabled, the step only runs if the target element exists on the page — otherwise it's skipped. Useful for sites where popups or login states vary between visits.
Delete & Reorder
Click the ✕ button on the right side of a step to delete it. Drag and drop steps up or down to reorder them.
4-7. Using Variables
| Variable | Description | Default |
|---|---|---|
{{input}} | Keyword extracted from your Telegram message | — |
{{count}} | Number of items to collect (FEED step) | 5 |
GOTO URL:   https://news.google.com/search?q={{input}}
FILL step:  {{input}}
→ Telegram: "Search Tesla news" → input = "Tesla" is substituted automatically
4-8. Keychain — Storing Sensitive Info
Credentials like login usernames and passwords should not be saved directly in a scenario file. Store them in Keychain (user_data/keychain.json) instead. Reference them in a FILL step value like this:
@alias.id    → the username for that account
@alias.pass  → the password for that account
Example: @amazon.id / @amazon.pass → when the scenario runs, the real values are read from keychain.json and filled in automatically.
4-9. Writing a Prompt
A Prompt is a text instruction that tells AI how to format and summarize collected data before sending it to Telegram. Write it when saving a scenario. If left empty, raw data is sent to Telegram as-is without any AI summarization.
Example 1 — for FEED:

(Response Format)

This is the Amazon bestseller list.

1. Product name, price, etc. | link

2. Product name, price, etc. | link


Example 2 — for READ:

(Response Format)

The current weather is xxxxxxxxxx.
4-10. TEST PLAY — Verify Before Saving
Run through the current steps to make sure everything works before saving.
4-11. Saving & Loading
'Save:' Click 'Save' → enter a file name → saved as .json in user_data/scenario/.
'Open:' Click 'Open' → select an existing .json scenario file → continue editing.
4-12. When Recording Fails
| Problem | Solution |
|---|---|
| Clicking doesn't record a step | Make sure RECORD is active (red STOP state). Some sites block click event propagation. |
| FEED shows only 1 or 0 matches | Make sure ITEM 1 and ITEM 2 are structurally the same type of element. Try clicking a simpler element — for example, just the title text instead of the whole card. If using an anchor, check that it points to the correct section label. |
| A CLICK step fails during TEST PLAY | Click the step and check whether the SELECTOR highlight points to the right element. The site's structure may have changed — delete the step and re-record it. |
| A bot protection challenge page appears | The app automatically opens a second browser and attempts to bypass it. Some heavily protected sites cannot be bypassed. |
| Steps fail because the page loads slowly | Add a WAIT step just before the failing step (2–5 seconds). Or enable IF Mode on the step so it's skipped when the element isn't found. |
5. Agent
Remote Control via Telegram Bot
While the agent is running, send messages to your Telegram bot to trigger scenarios remotely.
Telegram Commands
Natural Language Examples
Tesla Google News 10
→ AI selects the news scenario, runs it with input="Tesla", count=10

AAPL stock price
→ AI selects the stock price scenario, runs it with input="AAPL"
How It Works
Background Mode
Enable 'Background Mode' to run Chrome in the background — no browser window will appear on screen while it works.
6. Scheduler
Run scenarios automatically at scheduled times.
Adding a Schedule
Schedule Types
| Type | Description | Settings |
|---|---|---|
| Daily | Runs every day at a set time | Time (e.g. 09:00) |
| Weekly | Runs on specific days of the week | Day(s) + time |
| Interval | Repeats at a fixed interval | Interval (hours) + start/end time |
| Once | Runs one time only | Date + time |
Managing Schedules
Toggle a schedule on/off to pause it temporarily. Click the delete button to remove a schedule. Results are automatically sent to Telegram after each run.
7. Account
Log In
Sign Up
Forgot Password
Logout
Click the 'Logout' button. Your login info is stored in user_data/settings.json.
Check Your Plan
Go to 'My Plan' to see your current subscription and upgrade options.
8. Tray Icon & Background
9. File Structure
├── chrome_automation_profile/ # Dedicated Chrome profile
├── scenarios/ # Saved scenario JSON files
├── .env # OpenAI API Key, Telegram Token/Chat ID
├── cue.json # Saved schedules
├── keychain.json # Manage saved credentials
└── settings.json # App settings and login token
user_data/ folder contains sensitive information. Do not share it with others.user_data/ folder, but note that you may need to log in again due to cookie changes.10. Troubleshooting
Chrome is not detected
Make sure Chrome is installed. If it's installed in a non-standard location, check whether C:\Program Files\Google\Chrome\Application\chrome.exe exists.
Google login doesn't complete
Sign in to your Google account in the browser — the app detects it automatically once the page navigates after login. If you have two-factor authentication, complete that process as well.
The Telegram bot doesn't respond
Make sure the agent is running — check that the AGENT button is active. Verify that TELEGRAM_TOKEN and TELEGRAM_CHAT_ID are correctly saved in user_data/.env.
'This account is open on another PC' message appears
The app allows only one PC per account. Please disconnect the previous session to continue.